

View Clipping
Table of contents
Often to fit a particular UI design it is not enough to have views with a regular shapes. Library provides the ability to define a specific visible area of the view, allowing us to create complex shapes or crop views. It works by defining a clipping region using "clip" property that limits the rendering of the views's content.
| Property | Type | Description |
|---|---|---|
| "clip" | ClipShapeProperty |
Clipping region |
The value of the property is a ClipShapeProperty interface.
Lets have a look at different types of clip shapes supported by the library and how to define them.
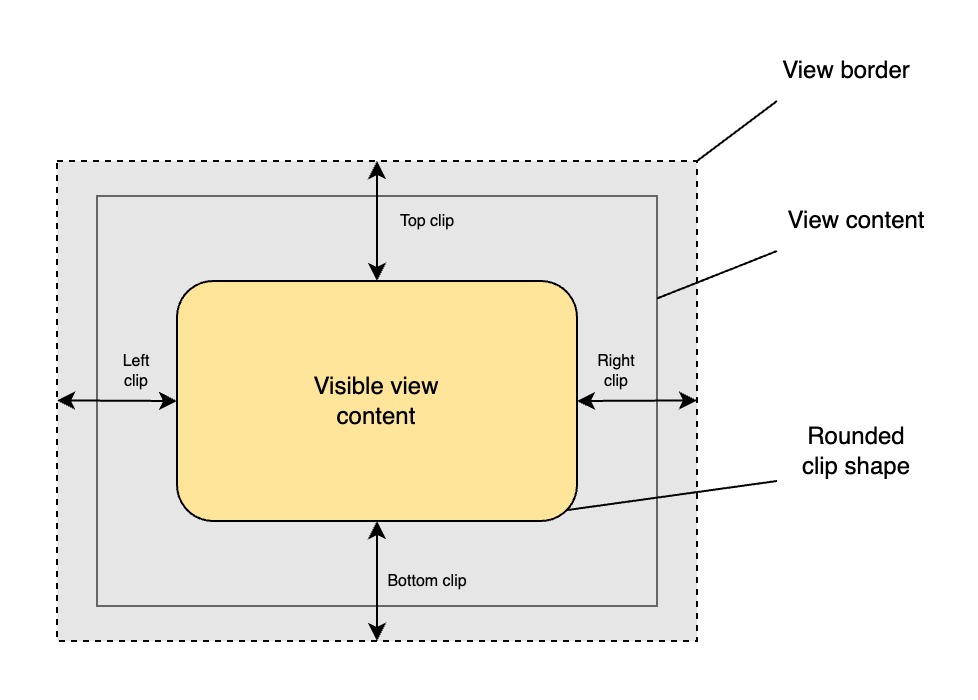
Inset clip
An inset clip defines a rectangle that clips the content, leaving a margin between the actual view borders and the clip region. Optionally, we can define a radius for the corners.
To create an inset clip shape we can use a global rui.NewInsetClip() function:
Go
func NewInsetClip(top, right, bottom, left SizeUnit, radius RadiusProperty) ClipShapeProperty
To get more information on RadiusProperty please check the View Radius page.
Here is an example of how we can make an inset clip from the source code:
Go
view := rui.NewImageView(session, rui.Params{
    rui.Width:  rui.Px(128),
    rui.Height: rui.Px(128),
    rui.Fit:    rui.CoverFit,
    rui.Source: "avatar.png",
    rui.Clip: rui.NewInsetClip(
        rui.Percent(5), // top
        rui.Percent(5), // right
        rui.Percent(5), // bottom
        rui.Percent(5), // left
        rui.NewRadiusProperty(rui.Params{
            rui.X: rui.Percent(10), // radius-x
            rui.Y: rui.Percent(10), // radius-y
        }),
    ),
})
The inset clip can also be configured in resource description file. For this a special object format is used:
inset {
    left = <value>,
    top = <value>,
    right = <value>,
    bottom = <value>,
    radius = <value> | <RadiusProperty>,
}
where <value> is a text representation of the SizeUnit type.
The "radius" property also can contain text representation of the RadiusProperty type, you can get more details on View Radius page.
Below is an example of how we can define a clip shape for the avatar image using a resource description file.
RUI
ImageView {
    width = 128px,
    height = 128px,
    fit = cover,
    src = "avatar.png",
    clip = inset {    // Setting inset clip
        left = 5%,
        top = 5%,
        right = 5%,
        bottom = 5%,
        radius = _{   // Text representation of the RadiusProperty
            x = 10%,
            y = 10%,
        },
    }
}
Here is how the result of the above code may look like:
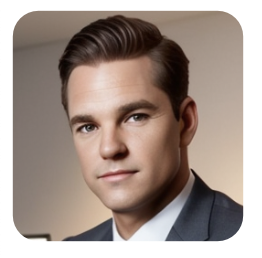
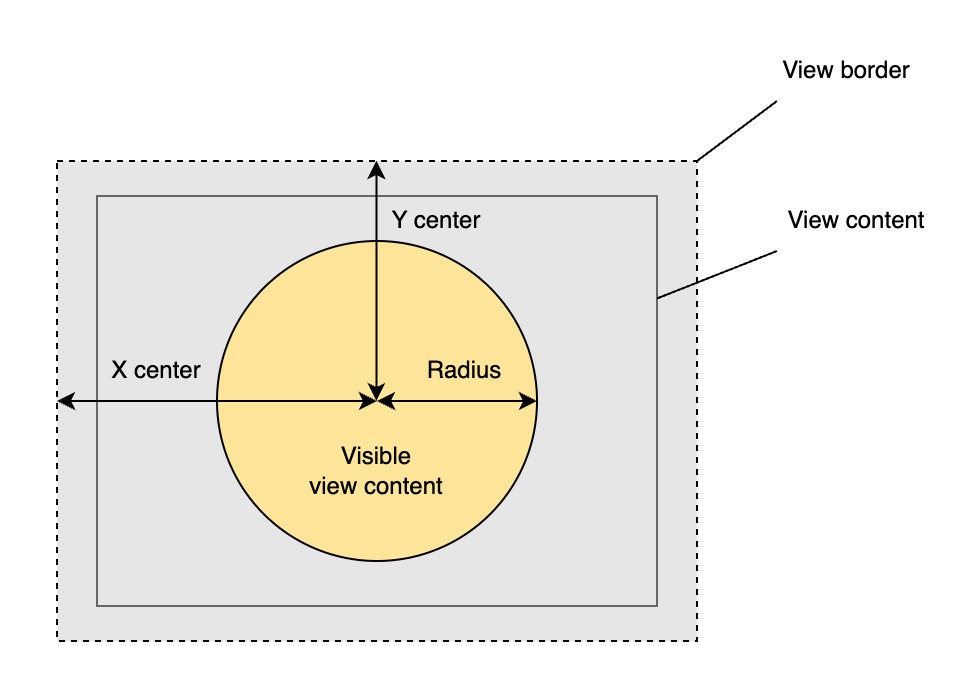
Circle clip
The circle clip creates a circular clipping region with a radius and the center coordinates.
To create a circle clip shape we can use a global NewCircleClip() function:
Go
func NewCircleClip(x, y, radius SizeUnit) ClipShapeProperty
Here is an example of how we can make a circle clip from the source code:
Go
view := rui.NewImageView(session, rui.Params{
    rui.Width:  rui.Px(128),
    rui.Height: rui.Px(128),
    rui.Fit:    rui.CoverFit,
    rui.Source: "avatar.png",
    rui.Clip: rui.NewCircleClip(
        rui.Percent(50), // x
        rui.Percent(50), // y
        rui.Percent(45), // radius
    ),
})
The circle clip can also be configured in resource description file. For this a special object format is used:
circle {
    x = <value>,
    y = <value>,
    radius = <value>,
}
where <value> is a text representation of the SizeUnit type.
Notice that the "radius" property accept only the values of the SizeUnit type.
Below is an example of how we can define a clip shape for the avatar image using a resource description file.
RUI
ImageView {
    width = 128px,
    height = 128px,
    fit = cover,
    src = "avatar.png",
    clip = circle {    // Setting circle clip
        x = 50%,
        y = 50%,
        radius = 45%,
    }
}
Here is how the result of the above code may look like:

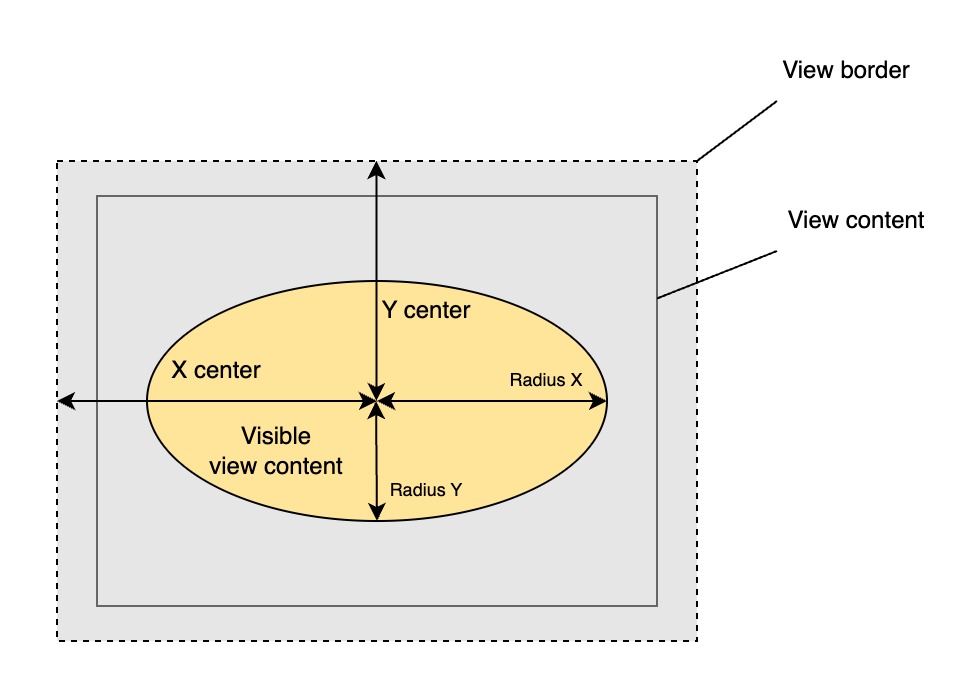
Ellipse clip
The ellipse clip creates an elliptical clipping region with specified horizontal and vertical radii, as well as center coordinates.
To create an elliptical clipping shape we can use a global rui.NewEllipseClip() function:
Go
func NewEllipseClip(x, y, rx, ry SizeUnit) ClipShapeProperty
Here is an example of how we can define an elliptical clipping shape in the source code:
Go
view := rui.NewImageView(session, rui.Params{
    rui.Width:  rui.Px(128),
    rui.Height: rui.Px(128),
    rui.Fit:    rui.CoverFit,
    rui.Source: "avatar.png",
    rui.Clip: rui.NewEllipseClip(
        rui.Percent(50), // x
        rui.Percent(50), // y
        rui.Percent(40), // rx
        rui.Percent(45), // ry
    ),
})
The elliptical clip can also be configured in resource description file. For this a special object format is used:
ellipse {
    x = <value>,
    y = <value>,
    radius-x = <value>,
    radius-y = <value>,
}
where <value> is a text representation of the SizeUnit type.
Below is an example of how we can define a clip shape for the avatar image using a resource description file.
RUI
ImageView {
    width = 128px,
    height = 128px,
    fit = cover,
    src = "avatar.png",
    clip = ellipse {    // Setting elliptical clip
        x = 50%,
        y = 50%,
        radius-x = 40%,
        radius-y = 45%,
    }
}
Here is how the result of the above code may look like:

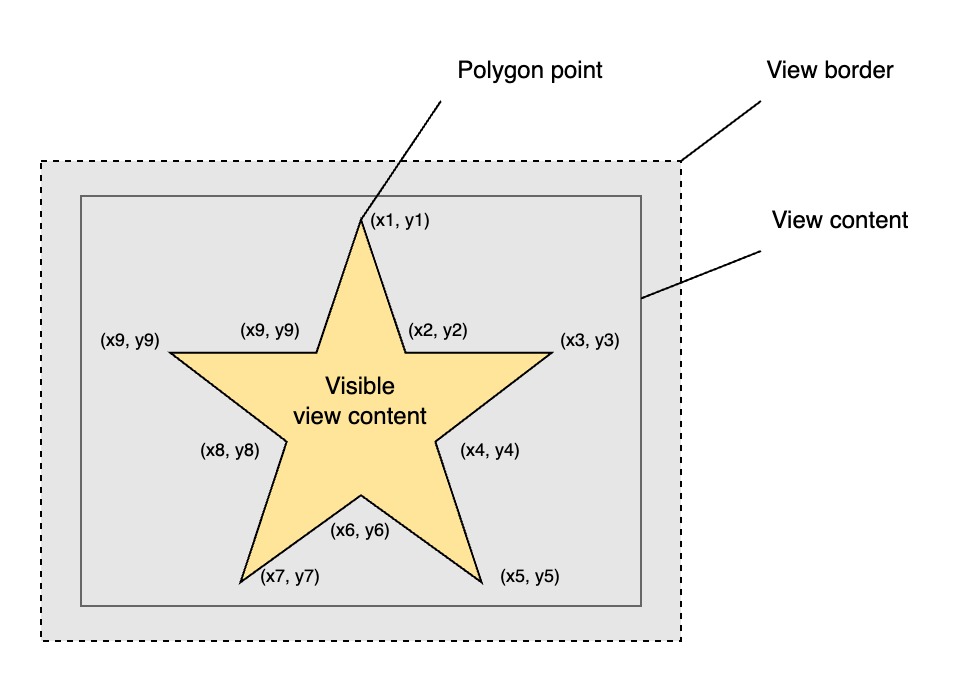
Polygon clip
The polygon clip establishes a clipping region shaped as a polygon, using specified coordinate points.
To create a polygon clipping shape we can use a following global functions:
Go
func NewPolygonClip(points []any) ClipShapeProperty
func NewPolygonPointsClip(points []SizeUnit) ClipShapeProperty
where "points" is an array of point coordinates in the format: x1, y1, x2, y2 ...
The NewPolygonClip() function can accept point coordinates in different types.
They could be names of constants, text representation of the SizeUnit type, or SizeUnit type itself.
Here is an example of how we can define a start polygon clipping shape in the source code:
Go
view := rui.NewImageView(session, rui.Params{
    rui.Width:  rui.Px(128),
    rui.Height: rui.Px(128),
    rui.Fit:    rui.CoverFit,
    rui.Source: "avatar.png",
    rui.Clip: rui.NewPolygonPointsClip( // Setting polygon clip
        []rui.SizeUnit{
            rui.Percent(50), rui.Percent(0), // Point 1
            rui.Percent(70), rui.Percent(25), // Point 2
            rui.Percent(100), rui.Percent(38), // Point 3
            rui.Percent(83), rui.Percent(67), // Point 4
            rui.Percent(80), rui.Percent(100), // Point 5
            rui.Percent(50), rui.Percent(92), // Point 6
            rui.Percent(19), rui.Percent(100), // Point 7
            rui.Percent(16), rui.Percent(67), // Point 8
            rui.Percent(0), rui.Percent(38), // Point 9
            rui.Percent(30), rui.Percent(26), // Point 10
        },
    ),
})
The polygon clip can also be configured in resource description file. For this a special object format is used:
polygon {
    points = "x1, y1, x2, y2, ..., xn, yn",
}
where x1, x2, ..., xn and y1, y2, ..., yn are the polygon point coordinate values in the form of the text representation of SizeUnit type.
Below is an example demonstrating how to define a clip shape for an avatar image using a resource description file.
RUI
ImageView {
    width = 128px,
    height = 128px,
    fit = cover,
    src = "avatar.png",
    clip = polygon {    // Setting polygon clip
        points = "50%, 0%, 70%, 25%, 100%, 38%, 83%, 67%, 80%, 100%, 50%, 92%, 19%, 100%, 16%, 67%, 0%, 38%, 30%, 26%",
    }
}
Here is how the result of the above code may look like:

Updating clip shape properties
To retrieve the clip shape of the view a global function rui.GetClip() is used:
Go
func GetClip(view View, subviewID ...string) ClipShapeProperty
The ClipShapeProperty interface inherit the Properties interface which allows us to manipulate the properties of already constructed clip shape.
For this we can use Get() and Set() methods.
Below is the list of properties we can work with:
| Property | Type | Applicability | Description |
|---|---|---|---|
| "left" | SizeUnit |
Inset clip shape | Left border position |
| "top" | SizeUnit |
Inset clip shape | Top border position |
| "right" | SizeUnit |
Inset clip shape | Right border position |
| "bottom" | SizeUnit |
Inset clip shape | Bottom border position |
| "radius" | SizeUnit |
Inset and circle clip shapes | The radius of the corners of the inset clip shape or the radius of the circle clip shape |
| "x" | SizeUnit |
Circle and ellipse clip shape | Horizontal center position of the clip shape |
| "y" | SizeUnit |
Circle and ellipse clip shape | Vertical center position of the clip shape |
| "radius-x" | SizeUnit |
Ellipse clip shape | Horizontal radius of elliptic clip shape |
| "radius-y" | SizeUnit |
Ellipse clip shape | Vertical radius of elliptic clip shape |
An example which demonstrate how to update the circle clip shape properties at runtime:
Go
if clipShape := rui.GetClip(view, "view-id"); clipShape != nil {
    if !clipShape.Set(rui.Radius, rui.Percent(30)) {
        // Something went wrong
    }
}
The clip shape can also be constructed by the rui.NewClipShapeProperty() global function, which might be convenient for some users.
It utilizes the rui.Params type that accepts all listed above properties for the specific clip shape type.
Go
view := rui.NewImageView(session, rui.Params{
    rui.Width:  rui.Px(128),
    rui.Height: rui.Px(128),
    rui.Fit:    rui.CoverFit,
    rui.Source: "avatar.png",
    rui.Clip: rui.NewClipShapeProperty(
        rui.EllipseClip, // Ellipse clip shape type
        rui.Params{
            rui.X:       rui.Percent(50), // Center point x-coordinate
            rui.Y:       rui.Percent(50), // Center point y-coordinate
            rui.RadiusX: rui.Percent(40), // x-radius
            rui.RadiusY: rui.Percent(45), // y-radius
        }),
})
The first parameter of the rui.NewClipShapeProperty() function has a ClipShape type which accepts the following values: rui.InsetClip, rui.CircleClip, rui.EllipseClip, and rui.PolygonClip.
Be careful when setting properties using that function because some of them are valid only for specific types of the clip shapes.
To get back the type of the clip shape we can use the Shape() method of the ClipShapeProperty interface:
Go
if clipShape := rui.GetClip(view, "view-id"); clipShape != nil {
    shapeType := clipShape.Shape()
    // Do something with the value
}